Monday, May 29, 2017

Dulce De Leche Macarons For The Win!

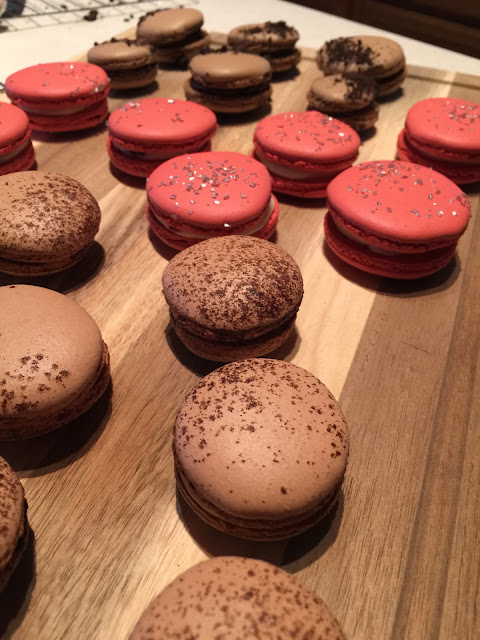
I've enjoyed a great almost two weeks without baking or posting anything. I'm still on track for the 52 recipe posts by the end of 2017, so that makes me happy. I keep saying that I am going to bake something other than macarons but I'm addicted to baking them. It's not like they are a breeze to make. I'm literally in the kitchen for hours between making batter, cleaning mixers and bowls, letting cookies rest, baking cookies, cleaning kitchen again, making fillings, yada yada yada. It takes a lot of time. I just feel a sense of accomplishment when I sandwich those two macaron shells together to form a beautiful treat. Oh and by the way I was watching season two of Versailles online and started craving macarons just like Louis XIV and Philippe I,  Duke of OrlĂ©ans. My favorite macaron flavors of all time are Pistachio, Lemon, and Coffee. Anytime I actually purchase macarons it will always be one of those three flavors. I was also teetering over making salted caramel for some reason. I attempted to make caramel like a year ago but I didn't have a thermometer and the caramel looked like it was great but when I tasted it, it was burnt so it had the most disgusting bitter  taste. I have been scarred and never attempted the caramel making again. This brings me to a great alternative, dulce de leche. You can totally buy dulce de leche already in a jar or can at most stores, but I found out you can basically make it yourself with condensed milk and a whole lot of patience. I also didn't want to make three different batches of macaron and end up with hundreds of macaron shells so I took my go to recipe and split it into three mini batches (chocolate was my base). With chocolate being my base I split the batter into three bowls making red velvet, mint chocolate cookie, and mocha. For the purpose of this post we will focus on the mocha macaron with dulce de leche filling.

Dulce De Leche Macaron
Mocha Macaron with Dulce De Leche Filling

 It kind of reminds me of my favorite Starbucks drink, a caramel macchiato.  It definitely has a kick with the espresso powder dusted on top and within the shell. The dulce de leche filling has a sweet taste that compliments the bitter coffee notes. I really enjoyed this macaron and will be making it again in the future with a few tweaks here and there.

First lets go over the filling

you need

Dulce De Leche Filling

  • 1 can of sweetened condensed milk
  • 1 saucepan or small pot
  • 1 jar with a loose lid
  • water
This is so easy, first, pour you sweetened condensed milk in your glass jar

Sweetened Condensed Milk

Next, place the jar of condensed milk into your small saucepan or pot

Fill the pot with water just a little above the condensed milk (it's hard to see in the picture below) you want to cover the condensed milk not submerge the whole jar (does that make sense?)


Now all you have to do is sit and wait, and stir. I had my stovetop burner on medium heat for 1 hour. You should check after one hour, you may need to add water due to evaporation. After the hour mark you may like a more liquidy dulce de leche sauce (like for ice cream sundaes, or a drizzle on a dessert) feel free to stop but for a thick filling it needs to cook at least two more hours. You also need to stir every 30 minutes. I cooked mine for 3 hours and you also need to add more water to make sure it covers the condensed milk (every 30 minutes I stirred and refilled the water in the pot)

Once the dulce de leche reached the consistency and color/flavor I wanted I took it out of the water and let it sit on the countertop to cool (remember this is basically a caramel and it will thicken as it cools)

*If you use this as a filling I would recommend making it a day before that way it cools and sets and thats one less thing you have to do.

Dulce De Leche aka 3-hour boiled sweetened condensed milk


Mocha Macaron Shell

  • 150g of powdered sugar
  • 150g of almond flour/meal
  • 150g of granulated sugar
  • 50g of water
  • 120 g of room temperature egg whites separated into two bowls (60g each)
  • 35 g of granulated sugar
  • Brown food color gel
  • 2 tbs of espresso powder or instant coffee
  • 5g of cocoa powder
Ok for the macarons

First take your powdered sugar, almond meal, cocoa powder and run that through a fine mesh sieve. Then take a whisk and mix all the ingredients after they have been sifted, then just set aside.


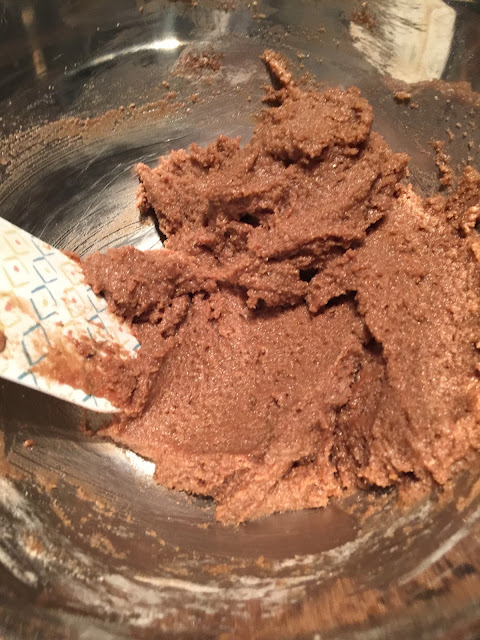
Take 60g of your room temperature egg whites and fold it into your dry ingredients. This is going to form a thick almond paste, after folding just set the almond mixture aside.


Now take your other 60g of egg whites and place them in your stand mixer on medium until they start to get foamy.


When your egg whites get foamy add in the 35g of granulated sugar slowly and mix on medium to high speed until soft peaks form.

when you achieve soft peaks turn down the speed of your mixer and keep your egg whites beating on low speed (like 1-2 speed)

Now take your 150g of granulated sugar and 50g of water  and place it in a saucepan on your stove on medium heat. 


Let this boil until the temperature on your thermometer hits 240F (soft ball on candy thermometer)

Carefully take your sugar syrup and pour it down the side of your stand mixer ( in a slow steady stream) while the egg whites are whipping.


Continue whipping this mixture on high speed until your bowl cools down and stiff peaks form so about 10-15 minutes you should have a very glossy, shiny merengue, flip the bowl over and it shouldn't move.

Nice Italian meringue

Now take 1/3rd of the egg whites and fold it into your almond paste


Now once your 1/3 meringue  and almond paste combine you can add all of the meringue and continue folding.


One that was all folded together I added some espresso powder

Oooooo it smells so good

Hahahah it was kind of strong

I also added in a few drops of warm brown gel food coloring

Take your macaron batter and place in a large piping bag with a round tip attached.

On a parchment lined tray pipe out 1.5 inch circles, tap your tray on the counter top once finished piping. I then dusted more espresso powder on top of each shell for garnish so they would let you know what flavor macaron you are eating. I wanted a strong coffee flavor, if that's not your thing, you can dust with cinnamon, cocoa powder or nothing at all, maybe add sprinkles, or nuts. 

Coffee macaron
Waiting to be baked

Preheat your oven to 300F

Let them sit on your counter to create a skin (I like to let them rest at least 30 minutes, normally an hour as I clean up the kitchen) You will know they are ready when you touch the macaron shell and nothing sticks to your finger. The macaron will also turn a flat matte finish.

Place your macarons in the 300F oven for 14-16 minutes (I rotate the tray at the 7 minute mark)

I then take them out of the oven and off of the baking tray and place them on the counter top still on the parchment paper to cool 

After a few minutes I like to match up the macaron shells of similar size and get them ready to be filled.

mocha macaron
I think the funnest part is matching the macaron shells together.

Place the dulce de leche in a piping bag and place it in your fridge to chill and firm up. This can be made ahead of time. 

mocha macaron
Ready to get some delicious filling


Just pipe a bit in the center of your mocha macaron, I added a few sprinkles of coarse sea salt to give the filling that salted caramel taste. 

coffee macaron
Dulce deliciousness

dulce de leche filling
Look at those little flecks of salt


Now just sandwich them together. Place your macarons in an airtight container in the fridge and let them mature for at least 24 hours. They will taste amazing and all of the flavors will meld together. I think if you love chocolate, caramel, and coffee these are the treats you need in your life. They really remind me of a caramel macchiato. They also look fancy af. 

dulce de leche filling
So fancy, so good 

dulce de leche macarons
A board full of deliciousness


Tuesday, May 16, 2017

Strawberry Tart For The Win!


Here's another yummy spring treat, I made this for my mom for Mother's Day. It's a beautiful strawberry tart. I made this tart in steps just like I did with the mango and lemon tarts. I started by making a strawberry puree, then a strawberry curd and finally the tart. I added fresh strawberries, a dusting of powdered sugar and pistachios to the finished tart.

Strawberry Tart
Strawberry Tart


so first you should start with making a strawberry puree

Strawberry Puree

  • 1lb of strawberries
  • 1/4 cup to 1/2 cup  of sugar
  • 1/4  to 1/2 cup water
This is simple, you may not need all of the water and sugar, this is something that you just need to taste and see. It depends on the sweetness of your fruit. 


Now dice up your strawberries into smaller pieces, they don't have to look pretty or be uniformed sizes because they will just get blended. I also had a tiny bit of water, and some sugar handy (if you think your strawberries are sweet enough you don't need to use the sugar, so just taste it as you go)


Blend using a blender or food processor. I just use a little magic bullet or one of those little ninja blenders.

Run the blended strawberries through a fine mesh sieve.

Strain out those big chunks


Strawberry puree
2 cups of strawberry puree

1 lb of fresh strawberries makes about 2 cups of puree


Now on to the strawberry curd
  • 1 Cup of Strawberry Puree
  • 3 tablespoons of fresh squeezed lemon juice (1 large lemon or 2 small lemons)
  • 4 large egg yolks (keep the egg whites for macarons)
  • pinch of salt
  • 3 teaspoons of corn starch
  • 1/3 cup of granulated sugar
  • 4 tablespoons cold unsalted butter (cut into small pieces)

Start by pouring your strawberry puree, sugar, lemon juice, cornstarch, and pinch of salt into your saucepan and whisk all together.


Whisk until everything is incorporated


Now add in your 4 egg yolks and whisk together


Take your saucepan and place it over medium/high heat. Whisk the mixture for 5-7 minutes, keep whisking so it will not burn. (I normally just stand there whisking with the oven timer on, I set I whisked for 6 minutes) The mixture will become thick, think like a pudding or custard thickness.


Now take it off the burner and whisk in your cold butter a little at a time


After all the butter is incorporated, I placed it in a jar with a lid and sat it on the counter, then after a few hours I placed it in the fridge. It taste so good ya'll. If you like lemon curd, or lime curd you will love this. Strawberry curd is a little tart, but not like lemon or lime, so it has a subtle tart taste and then that sweet mango flavor. 

strawberry curd
pretty pink strawberry curd

Now for the pastry shell

Pastry Shell (makes enough for 9 inch pan)
  • 1¼ cups all-purpose flour
  • ½ cup  powdered sugar (or ¼ cup granulated sugar)
  • ¼ teaspoon salt
  • ½ cup (1 stick) cold butter, cut into small cubes
  • 1 large egg
  • ½ teaspoon vanilla extract (optional)

First for the pastry shell, add flour, sugar, and salt in a food processor for a few seconds and pulse until combined. If you don’t have a food processor, you can do this by using a pastry cutter. 


Add butter and pulse until mixture becomes crumbly and resembles coarse meal, about 15 pulses.


Add egg and vanilla extract and keep pulsing until the dough is no longer dry and starts to clump together, about 10-15 seconds. Do not process to the point that a large ball of dough is formed; rather the dough should be quite crumbly with large clumps. Another way to check if it’s done is to take a piece of dough and press it between your thumbs – the dough should stick without feeling dry or crumbly.


Turn dough to a lightly floured surface and form into a ball. It should come together easily without being sticky. Flatten ball slightly with your hands to form a thick disc. Wrap with plastic wrap and refrigerate for at least 1 hour. I made this dough two days before and just placed it in the fridge for 2 days.


*If you don’t want to use the dough right away, you can refrigerate it for up to 3 days, or freeze it for up to a month and then thaw overnight in the fridge.


Now take your dough out of the fridge and let it sit on the counter for a few minutes to soften slightly for easy rolling. On a lightly floured surface, roll the dough out to fit your tart pan.


With a sharp knife, trim the edges of the pastry to fit the tart pan.
* Cover pan with plastic wrap and place in the freezer until firm, about 30 minutes. Frozen dough is less prone to shrinking while baking.

Preheat oven to 375F and place oven rack in the center.

Press parchment paper or aluminum foil tightly against the crust, covering the edges to prevent them from burning. Fill with pie weights/dried beans/uncooked rice, making sure they’re fully distributed over the entire surface.

Bake crust for 20 minutes, until foil no longer sticks to the dough. Transfer crust to a wire rack and remove weights and foil.

Bake for about 7-10 minutes longer until golden brown and dry. Transfer to a wire rack and let cool completely.

Now add in your Strawberry Curd and with a offset spatula or butter knife just smooth out the surface

strawberry tart
Yummy tart


I then placed the tart back in the fridge overnight, and then decorate however you like.

I added a dusting of powdered sugar and fresh strawberries to both sides. I also sprinkled pistachios in the center of the tart. It is a very springtime dessert, and I think people who enjoy slightly tart things will enjoy this tart. I am a huge fan of this tart. 

strawberry tart
Everyone loved it


added fresh cream

strawberry tart
so yummy

Pistachio and Blueberry Macarons For The Win!

I've been extremely busy these past couple of days trying to make delicious treats for my momma. The person I really love the most in this world. Two things I know that my mom loves are pistachios and blueberries. I know that after making strawberry curd I had egg whites leftover so I wanted to make these for her. I also didn't want to make one batch of the same flavor so I split my macaron recipe to make two flavors. Another thing I did was make the pistachio ganache like 2 weeks ago and placed it in a pipping bag and placed it in the freezer. I like to make fillings before because that saves time and you don't have to stress or wait for fillings to set. So for the pistachio macarons they have a pistachio white chocolate ganache. The blueberry macarons have a blueberry cheesecake filling with blueberry jam center. They are really delicious.

Blueberry Macarons
Pistachio + Blueberry Macarons

So Lets get started

Pistachio Macaron Shells + Blueberry Macaron Shells
  • 150g of powdered sugar
  • 150g of almond flour/meal
  • 150g of granulated sugar
  • 50g of water
  • 120 g of room temperature egg whites separated into two bowls (60g each)
  • 35 g of granulated sugar
  • Blue food color gel
  • Green food color gel
  • crushed pistachios
  • Blue Sprinkles
  • 5g of powdered pistachios
Ok for the macarons

First take your powdered sugar+almond meal and run that through a fine mesh sieve. Then take a whisk and mix all the ingredients after they have been sifted, then just set aside.


Take 60g of your room temperature egg whites and fold it into your dry ingredients. This is going to form a thick almond paste, after folding just set the almond mixture aside.


Now take your other 60g of egg whites and place them in your stand mixer on medium until they start to get foamy.


When your egg whites get foamy add in the 35g of granulated sugar slowly and mix on medium to high speed until soft peaks form.

when you achieve soft peaks turn down the speed of your mixer and keep your egg whites beating on low speed (like 1-2 speed)

Now take your 150g of granulated sugar and 50g of water  and place it in a saucepan on your stove on medium heat. 


Let this boil until the temperature on your thermometer hits 240F (soft ball on candy thermometer)

Carefully take your sugar syrup and pour it down the side of your stand mixer ( in a slow steady stream) while the egg whites are whipping.


Continue whipping this mixture on high speed until your bowl cools down and stiff peaks form so about 10-15 minutes you should have a very glossy, shiny merengue, flip the bowl over and it shouldn't move.


Now take 1/3rd of the egg whites and fold it into your almond paste


Now once your 1/3 meringue  and almond paste combine you can add all of the meringue and continue folding.


Now I divided the macaron mixture into two bowls for the two different flavors.


For the blueberry macaron shells I of course added blue food gel coloring ( be careful not to overmix the batter)


For the pistachio macarons I added 5g of pistachio dust and green gel food coloring


Take your macaron batter and place in a large piping bag with a round tip attached.

On a parchment lined tray pipe out 1.5 inch circles, tap your tray on the counter top once finished piping. I then placed crushed pistachios and sprinkles on some shells for garnish so they would let you know what flavor macaron you are eating. I really think the color contrast looks amazing.


Pistachio Macarons
Waiting to be baked

Blueberry Macarons


Pistachio Macaron
So pretty

Preheat your oven to 300F

Let them sit on your counter to create a skin (I like to let them rest at least 30 minutes, normally an hour as I clean up the kitchen) You will know they are ready when you touch the macaron shell and nothing sticks to your finger. The macaron will also turn a flat matte finish.

Place your macarons in the 300F oven for 14-16 minutes (I rotate the tray at the 7 minute mark)

I then take them out of the oven and off of the baking tray and place them on the counter top still on the parchment paper to cool 

After a few minutes I like to match up the macaron shells of similar size and get them ready to be filled.

Pistachio Macaron
Match up those shells


Blueberry Macaron
I love the spring colors


Now for some filling

Pistachio White Chocolate Ganache

  • 1 cup white chocolate
  • 1/2 cup of heavy cream
  • 4 tablespoon of pistachio dust
Let the cream come to a slight boil, pour over white chocolate and pistachio dust. Let sit for one minute, then mix to combine everything. Let cool, will thicken and place in a piping bag.


Place the ganache in a piping bag and place it in your fridge to chill and firm up. This can be made ahead of time. 

Just pipe a bit in the center of your pistachio macaron

pistachio Macarons
Pistachio macaron with pistachio white chocolate ganache

Now for the blueberry cheesecake macaron filling

It's a really simple recipe.
  • 4oz (half a package of cream cheese)
  • 1 cup of powdered sugar
  • and 3 tablespoons of blueberry preserves
Just mix everything together until fluffy and place in a piping bag.


blueberry macarons
I love the way the blueberries turn purple


I just piped some of the blueberry cheesecake filling around the macaron and placed a little bit of blueberry preserve in the middle


Blueberry Macarons with Blueberry cheesecake filling with blueberry preserves

pistachio macarons
Pretty and tasty

They turned out great and of course they taste amazing. I placed all of these in the fridge to mature and we enjoyed them on mother's day.