Saturday, July 29, 2017

S'mores Macarons For The Win!

S'mores, S'mores, S'mores. When you think of summer,  you think of S'mores. I've always had fond memories of eating s'mores surrounded by a campfire. I mean I've actually only went camping once and that was my freshman year of college (black people do not go camping). I just remember all of my friends laughing and having a great time while eating S'mores. I am still amazed at how something on the cusp of being burnt can taste so amazing. Yummy marshmallows that are crunchy on the outside and gooey on the inside are so perfect. I want to know whose idea it was to put a marshmallow on a stick and place it in an open fire. Then taking that same toasty marshmallow and sandwich that between a piece of chocolate and two graham cracker halves was definitely before their time. Ok, yeah my mind was wondering for a minute, I've had so many wonderful s'mores flavored things that I decided to make a s'mores flavored macaron (I made my sister make a list of all the weird macaron flavors that she could think of and this was one of them). I ended up making a graham cracker flavored macaron shell, chocolate ganache filling, a marshmallow filling (that I ended up toasting with a kitchen torch) and then I melted a little chocolate for a drizzle on top. I mean they taste like the yummiest bite sized s'more.

smores macarons
S'mores Macarons
I feel like my macarons have been more time consuming because it've been making dual fillings. These took from start to finish about 3 hours (prep, fillings, actual macarons, shells resting, baking, cooling, filling, and then cleaning). The great thing is you can make the fillings a day or two ahead and thats one less thing you have to do.

Here's what you are going to need. If you've followed my previous macaron posts this is the same macaron recipe using the Italian meringue method so you will need a stand mixer. Also if you want to toast the marshmallow filling you will need a kitchen torch ( I bought mine a while ago on Amazon for about 15 bucks and I have a can of butane from Home Depot to refill for about 4 dollars). Also since we are using the Italian meringue method and making macarons need to be precise to bake well I would suggest using a food scale for accuracy.

S'mores Macarons

  • 150g of powdered sugar
  • 145g of almond flour/meal
  • 5g of graham cracker crumbs
  • 150g of granulated sugar
  • 50g of water
  • 120 g of room temperature egg whites separated into two bowls (60g each)
  • 35 g of granulated sugar
  • Crushed graham crackers (for garnish)
Chocolate Ganache
  • 1 cup of semi sweet chocolate
  • 2 cups heavy cream

Marshmallow cream
  • 50g of water
  • 150g of granulated sugar
  • 60g of egg whites (thats basically the whites from two large eggs)
  • 35 g of granulated sugar


First take your powdered sugar, almond meal and 5g of graham cracker crumbs and run that through a fine mesh sieve. Then take a whisk and mix all the ingredients after they have been sifted, then just set aside.


Take 60g of your room temperature egg whites and fold it into your dry ingredients. This is going to form a thick almond paste, after folding just set the almond mixture aside.


This is a also a great place to add in any food coloring, I added a few drops of warm brown gel food coloring to mimic the color of graham crackers (remember that when you add in the meringue the color will lighten a lot). 


Now take your other 60g of egg whites and place them in your stand mixer on medium until they start to get foamy.


When your egg whites get foamy add in the 35g of granulated sugar slowly and mix on medium to high speed until soft peaks form.

when you achieve soft peaks turn down the speed of your mixer and keep your egg whites beating on low speed (like 1-2 speed)

Now take your 150g of granulated sugar and 50g of water  and place it in a saucepan on your stove on medium heat.


Let this boil until the temperature on your thermometer hits 240F (soft ball on candy thermometer)

Carefully take your sugar syrup and pour it down the side of your stand mixer ( in a slow steady stream) while the egg whites are whipping.


Continue whipping this mixture on high speed until your bowl cools down and stiff peaks form so about 10-15 minutes you should have a very glossy, shiny merengue, flip the bowl over and it shouldn't move.


Now take 1/3rd of the egg whites and fold it into your almond paste


Now once your 1/3 meringue  and almond paste combine you can add all of the meringue and continue folding.

Keep folding until it runs off of spatula in a ribbon

Take your macaron batter and place in a large piping bag with a round tip attached.


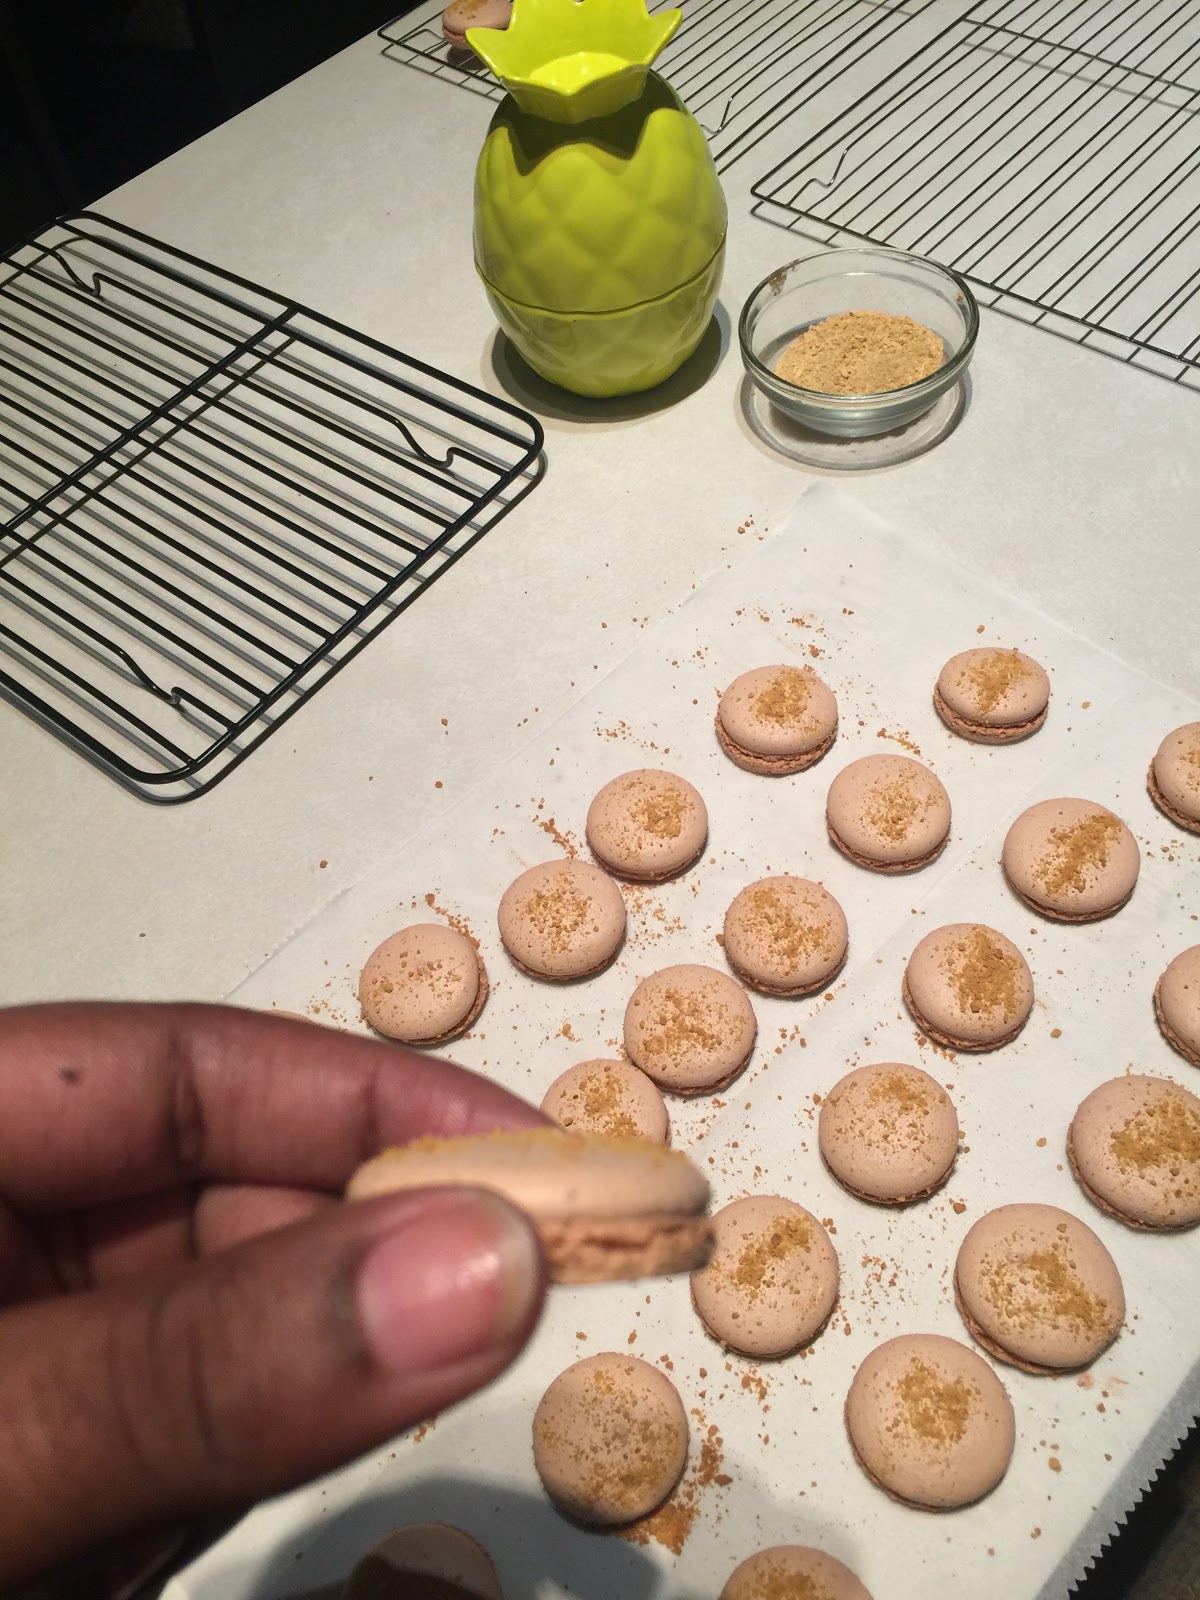
On a parchment lined tray pipe out 1.5 inch circles, tap your tray on the counter top once finished piping. I then sprinkled crushed graham cracker crumbs on the top of each shell for garnish so they would let you know what flavor macaron you are eating.

waiting to bake

Graham cracker goodness


Preheat your oven to 300F

Let them sit on your counter to create a skin (I like to let them rest at least 30 minutes, normally an hour as I clean up the kitchen) You will know they are ready when you touch the macaron shell and nothing sticks to your finger. The macaron will also turn a flat matte finish.

Place your macarons in the 300F oven for 14-18 minutes (I rotate the tray at the 7 minute mark), you can check doneness by lightly tapping the top of a macaron if there is no wiggle take them out of the oven.

While they are baking you can make the chocolate ganache & marshmallow filling.

First take one cup of semi sweet chocolate and place in a medium bowl.


Take two cups of heavy cream and place in a small/medium sauce pan. Place the saucepan on the stovetop over medium/high heat


When the cream starts to bubble around the edges take the cream off the heat and pour over chocolate. ( don't let cream boil rapidly or scorch the cream). Only pour enough to just cover the chocolate (about 1 cup of hot cream)

the steam fogged up the camara

Let the hot cream sit on chocolate for about a minute and then whisk to combine.

Add just enough hot cream to cover the chocolate

It will look really runny at first, like chocolate milk,  just keep whisking.


Keep whisking until it looks like this.

ganache
smooth chocolate ganache

Place the ganache in a piping bag, and place in the fridge to firm up.

You will have leftover ganache, it keeps well in the freezer

If you are filling the macarons the same day, I like to put my piping bag in the freezer to set up faster and then bring the ganache to room temperature by placing on the countertop right before piping.

For the marshmallow filling you follow the same steps as making the Italian Meringue above. If you don't want to do that just buy that marshmallow fluff stuff. I just don't want to repost the same pictures. So just scroll up and do the same thing with the 60g of egg whites (whites from two eggs) and place in a stand mixer and follow the steps above. When you are finished place the marshmallow cream in a piping bag.

Ok now your macarons should be done baking

I then take the macarons out of the oven and off of the baking tray and place them on the counter top still on the parchment paper to cool 

cooling on the counter

look at those macaron feet


After a few minutes I like to match up the macaron shells of similar size and get them ready to be filled.

match up those macarons

ready to be filled


First I piped a ring of marshmallow cream around each macaron

Pipe a nice ring of marshmallow cream

I then took my kitchen torch and carefully torched each marshmallow ring until it was nice and toasty

nice and toasted

After that in the center of each toasted marshmallow ring I piped some of the chocolate ganache

add a dollop of chocolate ganache

I then sprinkled more graham cracker crumbs on top of the chocolate ganache for even more graham cracker flavor.

smores macaron
A yummy sprinkle of graham cracker crumbs to finish the filling

Now just sandwich them together by placing a macaron shell on top.


smores macaron

For a little added something I melted a little milk chocolate and drizzled that on top of the finished macarons.

smores macaron
They are kind of tall because I didn't want to smash them

smores macaron
so yummy

There you have it, the S'mores Macaron. I placed these in an airtight container to mature in the fridge for at least 24 hours. 

smores macarons
These make you want to go camping

I tried one and they are super yummy, and will now be a summer staple for me in the future. I think they look cute and everyone who has tried them says they really taste like a S'more.

smores macaron

smores macaron
I took a bite to show the inside, crunch exterior, chewy interior, and marshmallow + chocolate filling


Sunday, July 23, 2017

Peanut Butter & Jelly Cookie Cups For The Win!

I've been thinking about what to bake and I really haven't baked a classic cookie. I was thinking about either an orange flavored short bread, a lime coconut shortbread cookie, or a peanut butter cookie. I had a ton of peanut butter in the pantry (when it's a buck you stock up) so I decided on peanut butter cookies. I've been craving peanut butter cookies for a while anyways. When I thought about the end result of a peanut butter cookie, I felt like they look too plain (peanut butter cookies aren't the prettiest cookies in the cookie universe), so I decided to go with a peanut butter and jelly masterpiece. I also had raspberry preserves from mother's day that I needed to use because I was tired of seeing a half empty jam jar in the fridge. I think the cookie cups are cute and I tried one last night and they taste amazing. I made a peanut butter cream cheese filling and it's the stuff dreams are made of.  When assembled together it reminds me of my favorite childhood snack, which was these PB&J Oatmeal Pies that Little Debbie made. My mom would have a little snack basket for us when we came home from school which would have all of your 90's essential snacks; Dunkaroos, Gusher's, Fruit Roll Ups, Cosmic Brownies, literally every cool snack but I would always go for those PB&J Oatmeal Pies. I think next time I will make an oatmeal cookie cup and use the same fillings, to recreate them. Back to the Peanut Butter & Jelly Cookie Cups, they are really delicious and fairly easy to make and you probably already have everything in your pantry to make them. Just look at them

Peanut Butter & Jelly Cookie Cup
Peanut butter cookie cup with peanut butter cream cheese filling and a raspberry sauce

I could have made them look a lot prettier but it was getting late and I was a little tired, but they still look wonderful. Oh and if you did not want to make them into cups you still will have a yummy peanut butter cookie recipe to keep with you.

So Let's get started, here's what you will need:

Peanut Butter Cookie Cups:

  • 1 1/4 cups all-purpose flour
  • 1/4 tsp baking soda
  • 1/2 tsp salt
  • 1/4 cup unsalted butter (room temperature)
  • 1/4 cup smooth peanut butter smooth (not natural)
  • 1/4 cup granulated sugar
  • 1/2 cup packed brown sugar 
  • 1 large egg (room temperature)
  • 1 tsp vanilla extract

Peanut Butter Cream Cheese Filling:

  • 8 oz cream cheese softened
  • 1/4 to 1/2 cup powdered sugar (depends on how sweet you'd like it)
  • 1/2 cup smooth peanut butter (not natural)


Topping:
1 cup raspberry jam preserves (actually whatever jam you have on hand)
Crushed peanuts for garnish

simple ingredients


First preheat your oven to 350°F.

Spray a regular sized muffin tins with cooking spray and set aside for later.

Whisk together flour, baking soda, and salt and set aside.


Beat butter and peanut butter until smooth.

I just zapped the butter in the microwave for about 15 seconds

so creamy


Add in both sugars and beat on med-high until pale and fluffy (approx. 2-3mins).


all fluffy


Reduce speed and add egg and vanilla. Beat until combined.


Add flour mixture and mix until just combined.

start really slow so you don't get flour everywhere then finish mixing with a spatula

peanut butter cookie dough


Using a large cookie scoop, scoop dough into muffin tins, press down to flatten slightly.

the pan looks super oily but I sprayed a lot to insure nothing sticks

Bake for 10-12 mins or until lightly browned and mostly set.

Remove from oven and immediately use a small jar or container to press firmly down in the center to create a well. Cool in pans for 10 mins, then place on wire rack to cool completely.

remember peanut butter cookies are soft and then they firm up, so if they look underdone thats fine


While the cookies are cooling you can make the peanut butter cream cheese filling.

First take your softened cream cheese and peanut butter and blend together for about 3 minutes

Peanut Butter + Cream Cheese
Now start with 1/4 of a cup of powdered sugar and blend until combined. Remember to taste as you go, I didn't want this too sweet because I used a honey peanut butter and wanted to taste the peanut flavor, so if you find you need more sugar add more.
taste and adjust sweetness as needed
When your mixture is sweetened you should place it in a piping bag or a ziploc bag to fill your cookie cups
this filling taste like the inside of a reese's peanut butter cup just smoother.

In a microwave safe bowl, heat raspberry jam to thin out. 20 second intervals. I then strained the mixture to remove the raspberry seeds.

After running this through a fine mesh sieve to get rid of the seeds.


Spoon 1 to 1 1/2 tsp of raspberry jam into each cookie cup. (I used a pastry brush to get the jam all inside each cookie cup) Then place in the fridge to chill for 20mins.

brush on the raspberries

Pipe the peanut butter cream cheese filling on top of raspberry jam.

pipe in the filling

you can eat these as is.

Top with additional raspberry jam and chopped peanuts to complete the Peanut Butter Jelly Cups

I was a little sloppy with the raspberry

top with honey roasted crushed peanuts

peanut butter & Jelly cookies
So Cute


Place these in the fridge to set for a few hours, I think these taste best cold.

Peanut Butter & Jelly
Peanut Butter & Jelly Cookie Cups

You should probably eat these within 2-3 days. Or freeze them for up to 4 weeks. Again this is a customizable dessert so you could use any jam, or add chocolate on top for like a Reese's cup cookie cup.

So Yummy